

Thun
-
Posts
386 -
Joined
-
Last visited
Content Type
Profiles
Forums
Events
Gallery
Store
Everything posted by Thun
-
Bear Creek 7/16 AM
Thun replied to Woody5442's topic in New York Fishing Reports - Lake Ontario (South Shore)
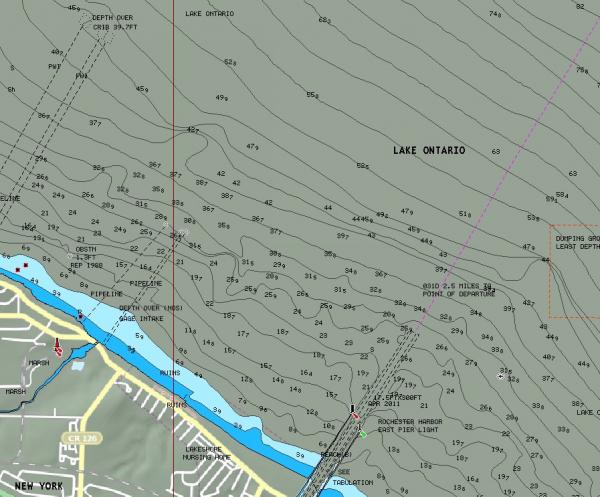 They could be cribs too which are wooden beam structures filled with rock to anchor water intake pipelines and such. Where a wreck symbol is more oval shaped a crib symbol is round on the chart. There's a wreck east of the Genesee River on this screen cap and several cribs at the end of a pipeline west of it. The square red marks are rocks.
 -
Bear Creek 7/16 AM
Thun replied to Woody5442's topic in New York Fishing Reports - Lake Ontario (South Shore)
I don't see that wreck east of Pultneyville on my Navionics but I don't doubt it's there. Nautical Charts are updated frequently because someone finds an uncharted obstruction. I think the Navionics card is great. I plug it into my FF and use the split screen plotter/sonar feature and the plotter let's you know your exact position. You can stay within certain depths also by following the depth contour lines and you can find your way home easily in unfamiliar waters. -
Bear Creek 7/16 AM
Thun replied to Woody5442's topic in New York Fishing Reports - Lake Ontario (South Shore)
Here's the LAT & LON and description -
Bear Creek 7/16 AM
Thun replied to Woody5442's topic in New York Fishing Reports - Lake Ontario (South Shore)
My Navionics shows a wreck in 30' of water about a half mile NE of Bear Creek. -
They really are a special breed aren't they? What would we do without them? a hero he is!
-
Mr clean's Fair Haven Report
Thun replied to mrclean's topic in New York Fishing Reports - Lake Ontario (South Shore)
 mrclean This might just be my all time favorite Blues song. I love the guitar in this. http://www.youtube.com/watch?v=-ZXzC39EDrY
 -
oswego and mexico area
Thun replied to p3434's topic in New York Fishing Reports - Lake Ontario (South Shore)
 Wow...nice one!
 -
Mr clean's Fair Haven Report
Thun replied to mrclean's topic in New York Fishing Reports - Lake Ontario (South Shore)
My condolences for the loss of your friend -
Yes you could use it. You'd have to crimp a ring terminal to each positive downrigger wire, then attach each wire to one of the terminals on the fuse block. So you'd connect both riggers to that one fuse block. Here's what my manual says about connecting my Mag 10's to the battery. Connecting to the Battery: It is strongly recommended that a fuse or manual reset circuit breaker be installed at the battery on the positive lead of the power cable or that you connect the downriggerto a battery selector switch. (See Fuse and Wire Specifications) Connect the positive lead (RED) to the (+) post on your battery and the negative lead (BLACK) to the (-) post on your battery or the downrigger will not operate. Use the quick disconnect plug to remove the downrigger without touching the battery. NOTE: It is strongly recommended to power your Magnum with a Deep-Cycle marine battery. Only run a Magnum from a Starter battery if it is recharged by an alternator while trolling. Tip: Control degradation of the power cables and limit corrosion by using anti-oxidant gel on all connections. So I went the fuse block and fuse route instead of the breaker route because I liked the way that block connects right to the battery...just slide it right on the positive battery post, tighten it down and add a 30A fuse for each rigger. Fair warning though, I paid 15 bucks for each fuse so the circuit breaker route is definately cheaper IMO.
-
I used a dual terminal fuse block on the positive battery post by Blue Sea. I suppose a circuit breaker would save the cost of replacing fuses when they blow. http://www.bluesea.com/products/2151/Dual_MRBF_Terminal_Fuse_Block_-_30_to_300A
-
I saw one of these solar powered baseball hats with fan in visor on Tru TV last week. I think I'd rather be hot than be seen with one of these on my squash. http://www.ebay.com/itm/SOLAR-POWERED-RED-BASEBALL-MESH-CAP-HAT-W-COOLING-FAN-VISOR-UNIQUE-GIFT-/400246288807?pt=US_Hats&hash=item5d3089b1a7
-
From the Cannon Magnum, 2011 or newer manual installation Wiring Your Downrigger Your Boat’s Electrical Condition It is important to make sure that your boat is properly set up before installing your Magnum with Positive Ion Con-trol (PIC). Whenever a boat is in water, various submerged parts interact to create weak electrical currents. These weak electrical currents must be controlled to extend the life of the boat’s metal parts and ensure a good fish catching environment. Check the zinc sacrificial anodes on your boat and on the outboard/outdrive. If they are more than 50% dissolved they should be replaced. Any coating of slime or growth should be cleaned off. All metal parts including the hull (ifmetal) must be interconnected by a grounding wire. This includes motor shafts, outdrives, and through hull fittings. If your boat and zinc anodes are set up correctly, the voltage on the stainless steel downrigger wire should be positive when in contact with the water. With your boat in the water and the downrigger cable deployed in the water, measure the dc voltage from the cable to a grounded metal surface of the boat touching the water. It should be 0.6-0.8VDC if properly wired. The use of Cannon vinyl coated lead weights is recommended. Use the trolling weight insulators supplied with your downrigger. This insulates your weight from the positive charge on the cable. This will also ensure that the trolling weight will stop at water level when retrieved. The cable on your downrigger should be replaced every 2 years. Etching of the cable can weaken it physically and electrically. In saltwater, make sure the sacrificial zinc anodes are replaced when half dissolved. This ensures that the boat will run with a neutral or slightly positive charge. Clean zincs on a regular basis with a non-corrosive brush. Always make sure the boat is properly grounded to the water. This will help ensure proper PIC voltage on the cable and that the Short Stop will function properly. NOTE: To ensure proper operation of your Magnum, ground the battery to your boat’s electrical system’s ground. Malfunctions with the PIC, communication between units, or loss of operation result from faultygrounding. Always check to see if your boat is properly grounded first. Electrical Specifications & Wiring Instructions The Magnum series is rated at 30 amps (full load), 12 volts DC and is protected by a 25 amp manual reset circuit breaker (located under motor housing). Be sure to measure the battery voltage of your boat. http://www.cannondownriggers.com/uploadedFiles/Service/Product_Manuals/3397130rh_Magnum_Combined.pdf
-
oswego and mexico area
Thun replied to p3434's topic in New York Fishing Reports - Lake Ontario (South Shore)
My son and I fished out in front of the Power Plant yesterday morning in about 150-175' of water, down 110 and caught a nice king about 22lbs and lost another that we think was bigger because the line was screaming off the spool. We had to stop fishing about 9:30 to head home. We fished friday too and boy was it rough! Friday we caught a 10lb king and lost another because the reel jammed up for some reason. Every hook up came off a white-glow Spin Doctor with a green A-Tom-Mik fly on the riggers 20' behind the ball. We were wishing we had a few more of those Spin Doctors and flies for the other rigger. -
The Tekota 800 retrieves 33 inches per crank...according to this website. http://gotfishingrodsandreels.com/pro949185.html
-
 Your videos are awesome...thank you for posting them...beautiful King.
 -
Did you check the shear pin to see if it's broken?
-
 I love Zach's baits. I bought a couple at the Happy Hooker last year and caught a couple of nice musky using them at Chautauqua. They're almost too pretty to use though. I love the way he signs and dates each one.
 -
Ruff Rider Video Tutorial - How to Run Copper
Thun replied to TOP SECRET's topic in Questions About Trout & Salmon Trolling?
Here's another tutorial on the 500 LC from Alan Tani. I hope you don't mind my butting in. http://alantani.com/index.php?topic=357.0 -
If you're feeling ambitious, while you have the reel apart you might want to consider replacing the drag washers (or greasing the ones already in the reel with Cal's drag grease) A poster on Alan Tani's reel repair website states, "the washer under the gear is HT-100 #6-113 and the 3 HT-100 in the stack are #6-309. But, check with Tuna's first, they'll send you the right ones for sure. http://alantani.com/index.php?topic=2372.0 I couldn't find a tutorial on his website for the Magda reel but this poster says the Convector tutorial helped him with his Magda http://alantani.com/index.php?topic=6245.0 The convector tutorial http://alantani.com/index.php?topic=774.0 And if you clean and lube the bearings with a good reel lube such as Corrosion X or Reel X (WD 40 will gum up the works), your reels will be like new. Here's a tutorial on bearings. Keep in mind spool bearings use oil, all other bearings use a marine grade grease. http://alantani.com/index.php?topic=13.0
-
That little v shaped piece is called the pawl and it rides in the grooves of the worm. Typically, these are bent because the line and line guide are out of sync. What happens is that if you allow the line to pass completely through the guide on to the reel, inevitably the reel handle gets turned and moves the guide along the worm gear throwing the line and guide out of sync. So the line ends up coming off the spool on one end while the guide is way over on the other end putting an enormous amount of stress on the pawl with a good fish on. This could cause the fish of a lifetime when you can't reel it in because the pawl gets bent and stuck in the worm gear. I posted a YouTube on the Tackle and Techniques section concerning this.
-
Since I'm a newbie at trout and salmon fishing on Lake Ontario, I don't have much to offer with regards to tips or technique but I thought I'd offer what little I do know. And thanks to all of you generous fishermen and women for sharing your knowledge with a rookie like me!
-
Mr clean's Fair Haven Report
Thun replied to mrclean's topic in New York Fishing Reports - Lake Ontario (South Shore)
Nice! Now get that 40lb'er. -
I have a 150 2 stroke and a 9.9 4 stroke LS on my 18' tin. The dealer hooked up the kicker to the main gas tank and installed a valve that I open to run the kicker. In the last couple of weeks I installed both an EZ Steer and a Trollmaster Pro Troll 2 and both were easy installs. Both accessories worked great this past weekend when I used them for the first time. If you do go with the EZ Steer, be careful inserting the rods together (with a twisting motion) as I darn near cut my thumb off forcing them together. The hardest part was running the Trollmaster wire that attaches to a servo on the 9.9 engine, under the gunnel. Top speed with the kicker using the Trollmaster is almost 5 MPH. Blue Heron, Had I known there was a Control King Rep member, I would have gone with the Control King instead of the Trollmaster, I basically flipped a coin and went with Trollmaster.
-
Mr clean's Fair Haven Report
Thun replied to mrclean's topic in New York Fishing Reports - Lake Ontario (South Shore)
Thanks for the clarification. -
Henderson 6/8/13
Thun replied to Chas0218's topic in New York Fishing Reports - Lake Ontario (South Shore)
 Thanks Chas0218. The fly was clean, no weeds, and although we didn't hook up, it's good to know our presentation triggered a strike. Next time!